#PHP OpenSSL
Explore tagged Tumblr posts
Visit Tumblr Blog
Explore Tumblr blogs with no restrictions, modern design and the best experience.
Last Seen Tumblr Blogs


Fun Fact
Tumblr was created by web developers David Karp and Marco Arment.
Text
PHP OpenSSL Encrypt & Decrypt
Merhabalar, bu yazımda PHP OpenSSL Encrypt & Decrypt konusuna değineceğim. Daha önceleri Encrypt & Decrypt konusunda bir yazı daha yazmıştım. Her ne kadar konu olarak aynı olsa da yöntem olarak farklı oldukları için yeni bir yazı olarak yazıyorum. Üstelik şifreleme üzerinde farklı programlama dillerine dair bir çok yazım var. Hepsini hemen aşağıya ekliyorum. PHP MD5 Şifreleme Kullanımı C#…
View On WordPress
0 notes
Link
0 notes
Text
جميع أوامر termux للأختراق والتهكير all Commands Termux
أوامر في تطبيق Termux من خلال هذا المقال سوف نتعرف على كل أوامر termux وشرح اهم الأوامر في تطبيق Termux للأختراق وكيفيه التعامله معه تطبيق Termux يعتبر من اهم التطبيقات التي يجب عليك تثبيته على هاتفك الأندرويد فأنت لست بحاجه لجهاز حاسوب لكي تتعلم الأختراق ولكن علينا اولاً ان نتعرف على التطبيق شرح termux commands list وما هي الاومر الاولى في تشغيل termux قبل البدء كل هاذا سوف نتعرف عليه من خلال هذا المقال . termux commands list
جميع أوامر termux للأختراق والتهكير all Commands Termux
اوامر termux للاختراق كنا قد نشرنا مواضيع كثيرة حول تطبيق تيرمكس وربما من اشهر هذه المواضيع شرح جميع اوامر Termux لكن اليوم سوف نقدم مجموعه اخرى من الأوامر المهمه والتي من خلالها سوف تتعرف على كيفيه التعامل مع تطبيق تيرمكس بشكل ممتاز دون الحاجه الى اي مساعدة من احد , وربما من اهم ما يجب ان تتعلمه هوا termux commands list اي أوامر تيرمكس وهذه امر مهم جداً فمن دونها لن تتكمن من التعامل مع التطبيق فلكل امر وظيفه معينه يقوم بها مثل تحميل الأدوات والتنقل بين الملفات وفهم الصلاحيات وغيرها اوامر termux .
لكن ما هوا termux وفيما يستعمل , حسناً دعني اجيبك بشكل مبسط تيرمكس اوامر termux هوا تطبيق عبارة عن Terminal اي سطر اوامر مبني على اللنكس من خلاله يمكنك تحميل ادوات الأختراق او وتشغيل سكربتات بللغات برمجيه مختلفه مثل Paython وغيرها فهوا شبيه الى حد ما في نظام Kali linux ولكن تيرمكس يعمل على الهاتف اي لست بحاجه الى جهاز كمبيوتر اوامر termux للاختراق .
أهم أوامر تشغيل termux قبل الأستعمال
pkg update pkg upgrade pkg install python pkg install python2 pkg install python3 pkg install ruby pkg install git pkg install php pkg install java pkg install bash pkg install perl pkg install nmap pkg install bash pkg install clang pkg install nano pkg install zip pkg install unzip pkg install tor pkg install sudo pkg install wget pkg install openssl
أوامر Termux لأنشاء ملفات والتنقل بينها
touch لأنشاء ملف جديد cat أنشاء ملف جديد بمحتوى echo “hello world” انشاء ملف جديد وكتابه بداخله cat >> [file name] – اضافه محتوى في ملف موجود مسبقاً mkdir [name] – انشاء فولدر او ملف جديد
أوامر النسخ واللصق Termux
cp لنسخ الملفات cp -r لنسخ الملف في اي مسار mv يستعمل لنقل الملفات من مسار الى اخر mv -v يستعمل لنقل اي ملف mv [file1 name] نقل واعادة تسميع الملف mv -i التحريك والكتابه فوق الملف mv -f – نقل الملف والكتابه فوقه بشكل اجباري
أوامر التنقل بين الملفات Termux
cd يستخدم لتنقل بين الملفات cd / يستعمل للرجوع الى ملف الروت cd .. لرجوع خطوة الى الخلف
وهذه أوامر الأخرى اساسيا�� termux
rm لحذف الملف pwd لمعرفه مسارك wget لتحميل الأدوات git clone لتحميل الأدوات من رابط apt install curl لتحميل apt search للبحث عن حزم unzip لفك الضغط عن الملف bye لعمل اغلاق لسطر الأوامر whoami – لمعرفه اسم المستخدم nano لتعديل على ملف ifconfig لمعرفه اي بي جهازك
تحميل جميع ادوات termux
Termux-kalinetHunter
git clone https://github.com/Hax4us/Nethunter-In-Termux cd Nethunter-In-Termux chmod +X* ./kalinethunter
Lazymux Tool
قد يعجبك ايضا
منذ عام
جميع أوامر termux للأختراق والتهكير all Commands Termux
منذ عام
تحميل كتاب أساسيات Termux للأختراق على الهاتف PDF
منذ عام
كتاب جميع أوامر تطبيق Termux
git clone https://github.com/Gameye98/Lazymux cd Lazymux chmod +X* python2 lazymux.py
Tool-X
pkg install git git clone https://github.com/Rajkumrdusad/Tool-X.git cd Tool-X chmod +x install.aex sh install.aex
اوامر Termux لاستخراج المتاحات
xHak9x
apt update && apt upgrade apt install git python2 sudo git clone https://github.com/xHak9x/fbi.git cd fbi sudo pip2 install -r requirements.txt sudo python2 fbi.py
theHarvester
git clone https://github.com/laramies/theHarvester ls cd theHarvester python2 theHarvester.py pip2 install requests python2 theHarvester.py -d hotmail.com -b google -l 500 python2 theHarvester.py -d yahoo.com -b google -l 500
أوامر termux اختراق wifi
wifiphisher
apt-get install git python apt-get install python python-pip python-setuptools pip install scapy git clone https://github.com/wifiphisher/wifiphisher.git cd wifiphisher python setup.py install cd wifiphisher python wifiphisher
جميع اوامر Terminal Emulator للاندرويد
dhcpcd dmesg dnsmasq dumpstate dumpsys dvz fsck_msdos gdbserver getevent getprop gzip hciattach hd id ifconfig
ash awk base64 bash busybox cat chmod chown cksum clear cmp cp cut date dd df diff dirname echo env expr false fgrep find gawk grep gunzip gzip head id install kill killall ln ls md5sum mkdir mknod mktemp mv nice nl nohup od paste patch pgrep pkill ps pwd readlink realpath rm rmdir sed seq sha1sum sha256sum sha3sum sha512sum sleep sort split stat stty sum tail tar tee test timeout touch tr true uname uniq unzip uptime users wc which xargs yes zcat ls: قائمة الملفات والدلائل في الدليل الحالي اوامر termux للاختراق . cd: قم بتغيير دليل العمل الحالي. mkdir: إنشاء دليل جديد. touch: قم بإنشاء ملف جديد. echo: إخراج النص المحدد. cat: عرض محتويات الملف. grep: ابحث عن أنماط في الإدخال. wget: قم بتنزيل ملف من الإنترنت. curl: نقل البيانات من أو إلى الخادم. apt-get: تثبيت أو إزالة الحزم من مدير الحزم. apt-cache: الاستعلام عن قاعدة بيانات مدير الحزم. find: البحث عن الملفات في التسلسل الهرمي للدليل. gzip: ضغط الملفات أو فك ضغطها. tar: إنشاء أو استخراج أو سرد محتويات أرشيف القطران. ssh: الاتصال بجهاز بعيد باستخدام بروتوكول SSH.
0 notes
Text
Sommario Panoramica dei Framework Funzionalità di Sicurezza Integrate Laravel vs CakePHP: Vulnerabilità e Aggiornamenti Dipendenze di Terze Parti Best Practices per lo Sviluppo Sicuro Laravel vs CakePHP: Considerazioni Finali Risorse Aggiuntive Laravel vs CakePHP: Conclusione Panoramica dei Framework Laravel Laravel è un framework PHP moderno e robusto, noto per la sua sintassi elegante e le sue funzionalità avanzate. Offre una vasta gamma di strumenti integrati che facilitano lo sviluppo di applicazioni web complesse in modo efficiente e sicuro. CakePHP CakePHP è un framework PHP maturo e stabile, apprezzato per la sua semplicità e flessibilità. Fornisce una struttura solida che permette agli sviluppatori di costruire applicazioni web rapidamente, con un'attenzione particolare alla convenzione rispetto alla configurazione. Funzionalità di Sicurezza Integrate Laravel Autenticazione e Autorizzazione: laravel fornisce un sistema di autenticazione preconfigurato, che può essere esteso e personalizzato facilmente. Supporta anche il controllo degli accessi basato su ruoli e permessi. Protezione CSRF: il framework include token CSRF per prevenire attacchi Cross-Site Request Forgery, assicurando che le richieste provengano da fonti attendibili. Crittografia: laravel utilizza la libreria OpenSSL per crittografare e decrittografare in modo sicuro i dati sensibili. Sanificazione dell'Input: offre meccanismi per sanificare gli input dell'utente, prevenendo attacchi SQL injection e XSS (Cross-Site Scripting). Logging e Monitoraggio: integrato con strumenti di logging come Monolog, permette di monitorare e registrare attività sospette o errori di sistema. CakePHP Validazione e Sanificazione: cakePHP offre potenti strumenti per validare e sanificare i dati dell'utente, proteggendo l'applicazione da input malevoli. Protezione CSRF e XSS: include componenti per proteggere l'applicazione da attacchi CSRF e XSS attraverso l'uso di token e sanificazione automatica dell'output. Autenticazione e Autorizzazione: fornisce plugin per gestire l'autenticazione degli utenti e il controllo degli accessi, con possibilità di personalizzazione. Crittografia: supporta la crittografia dei dati attraverso l'utilizzo di librerie esterne o componenti integrati. Laravel vs CakePHP: Vulnerabilità e Aggiornamenti Laravel Grazie alla sua ampia community, le vulnerabilità in Laravel vengono generalmente identificate e risolte rapidamente. Il team di sviluppo rilascia aggiornamenti e patch di sicurezza regolarmente. È essenziale mantenere il framework e le dipendenze aggiornate per beneficiare delle ultime correzioni. CakePHP Anche CakePHP, essendo un framework consolidato, dispone di meccanismi per affrontare le vulnerabilità. Tuttavia, la community è leggermente più piccola rispetto a Laravel, il che potrebbe tradursi in tempi di risposta più lenti per alcune problematiche. Mantenere il framework aggiornato rimane fondamentale. Dipendenze di Terze Parti L'utilizzo di pacchetti e librerie di terze parti può introdurre vulnerabilità. Entrambi i framework consentono l'integrazione di numerose estensioni, pertanto: Verifica delle Dipendenze: controllare la reputazione e l'affidabilità delle librerie utilizzate. Aggiornamenti Regolari: assicurarsi che tutte le dipendenze siano aggiornate alle ultime versioni stabili. Strumenti di Analisi: utilizzare strumenti come Composer per gestire le dipendenze e strumenti di analisi statica per identificare potenziali vulnerabilità. Best Practices per lo Sviluppo Sicuro Indipendentemente dal framework scelto, è importante seguire alcune pratiche standard: Validazione dell'Input: non fidarsi mai dei dati forniti dall'utente senza una corretta validazione. Gestione delle Sessioni: proteggere le sessioni con meccanismi sicuri, evitando l'esposizione di dati sensibili. Uso di HTTPS: implementare certificati SSL per criptare le comunicazioni tra client e server.
Protezione delle API: se l'applicazione espone API, assicurarsi che siano protette con autenticazione adeguata e limitare le richieste per prevenire attacchi DoS. Backup e Ripristino: implementare strategie di backup regolari e piani di ripristino in caso di violazioni o perdite di dati. Laravel vs CakePHP: Considerazioni Finali Quando Scegliere Laravel Progetto Complesso: se stai lavorando su un progetto che richiede funzionalità avanzate e scalabilità. Focus sulla Sicurezza Integrata: se desideri sfruttare le numerose funzionalità di sicurezza pronte all'uso. Community e Supporto: se ritieni importante avere accesso a una vasta community e risorse di supporto. Quando Scegliere CakePHP Progetto Leggero: se il tuo progetto è meno complesso e richiede un framework più leggero. Personalizzazione Elevata: se hai bisogno di maggiore controllo e personalizzazione sulle funzionalità di sicurezza. Apprendimento Rapido: se preferisci un framework con una curva di apprendimento più dolce e una struttura più semplice. Risorse Aggiuntive Guida alla Sicurezza in Laravel Guida alla Sicurezza in CakePHP OWASP Top Ten: Una lista delle principali vulnerabilità di sicurezza web. Laravel vs CakePHP: Conclusione La sicurezza non è un elemento da trascurare nello sviluppo web. Sia Laravel che CakePHP offrono strumenti e funzionalità per aiutarti a costruire applicazioni sicure. La scelta del framework dipenderà dalle specifiche esigenze del tuo progetto, dalle tue competenze e dalle risorse a tua disposizione. Ricorda che l'adozione delle migliori pratiche di sviluppo e la manutenzione costante sono fondamentali per garantire la sicurezza a lungo termine della tua applicazione.
0 notes
Text
Fedora Linux 40, Linux Çekirdeği 6.8 ile Resmi Olarak Yayınlandı, İşte Yenilikler

Fedora Workstation sürümü için en yeni GNOME 46 masaüstü ortamını ve Fedora KDE Spin için KDE Plasma 6'yı içerir. Fedora Projesi bugün, en yeni GNU/Linux teknolojilerinden bazılarını ve Açık Kaynak yazılımlarını içeren bu popüler dağıtımın en son kararlı sürümü olan Fedora Linux 40'ı piyasaya sürdü. En yeni ve en iyi Linux 6.8 çekirdek serisiyle desteklenen Fedora Linux 40 sürümü, amiral gemisi Fedora Workstation sürümü için GNOME 46 masaüstü ortamıyla ve varsayılan olarak Wayland oturumunu kullanan Fedora KDE Spin için KDE Plazma 6 masaüstü ortamıyla birlikte gelir. X11 oturumu tamamen kaldırıldı. Diğer Fedora Linux 40 özellikleri arasında varsayılan olarak IPv4 adres çakışması tespitinin etkinleştirilmesi, NetworkManager'da Wi-Fi bağlantılarına bireysel kararlı MAC adresleri atamak için varsayılan mod olarak stabil-ssid ve varsayılan sistem hizmetleri için systemd hizmet sağlamlaştırma özelliklerinin etkinleştirilmesi yer alıyor. Fedora Linux 40 ayrıca Delta RPM'lerin düşürülmesi ve DNF / DNF5'in varsayılan yapılandırmasındaki desteğin devre dışı bırakılması gibi bazı ilginç paket yönetimi değişikliklerini de içeriyor. Ayrıca, DNF davranışını artık varsayılan olarak dosya listelerini indirmeyecek şekilde değiştirir. Ancak bu sürüm, uzun zamandır beklenen DNF5 paket yöneticisiyle birlikte gelmiyor. Bu sürüm aynı zamanda PyTorch açık kaynaklı makine öğrenimi çerçevesinin komutla kolayca kurulmasını sağlar sudo dnf install python3-torch özelliği ile geliyor. Ancak mevcut PyTorch sürümü, GPU'lar ve NPU'lar gibi hızlandırıcılar için destek olarak yalnızca CPU desteğini içeriyor. Fedora Projesi lideri Matthew Miller, "Bu aracı Fedora Linux'ta kullanmayı mümkün olduğunca kolaylaştırmak istiyoruz .Şimdilik bu, teknolojiyle oynamak ve muhtemelen bazı hafif çıkarım yükleri için uygun." dedi. Fedora Linux 40, temel olarak GCC (GNU Derleyici Koleksiyonu) 14.0, GNU Binutils 2.41, GNU C Kütüphanesi (Glibc) 2.39, GDB (GNU Hata Ayıklayıcı) 14.1, Golang 1.22, LLVM'den oluşan güncel bir GNU araç zinciriyle birlikte geliyor. 18, Boost 1.83, Ruby 3.3, Podman 5, PostgreSQL 16, PHP 8.3, Kubernetes 1.29 ve IBus 1.5.30. Fedora Linux 40'ta, libuser kitaplığı ve bunun yerine shadow-utils'den gönderilecek olan passwd paketi, OpenSSL 1.1 ve Python 3.7 paketleri ve SASL mekanizması olarak NTLM kimlik doğrulaması gibi bazı özellikler kullanımdan kaldırıldı veya değiştirildi. Bu sürüm, Zlib'i Zlib-ng ile, mininizip'i mininizip-ng ile, wget'i wget2 ile ve iotop'u iotop-c ile değiştirildi. Diğer dikkate değer değişiklikler arasında /var/run selinux-policy girişlerinin /run'a taşınmasının yanı sıra UKI'lerin doğrudan başlatılmasını sağlamak için birleşik çekirdekler için geliştirilmiş destek, AArch64 mimarisi için UKI'lerin etkinleştirilmesi ve yalnızca UEFI bulut görüntüsü varyantının eklenmesi yer alıyor. AMD GPU'lar için Fedora Linux 40, AMD'nin yapay zeka ve HPC iş yükü performansı için optimize edilmiş yazılımının en son sürümü olan AMD ROCm 6.0 ile birlikte geliyor ve bu, en yeni amiral gemisi AMD Instinct MI300A ve MI300X veri merkezi GPU'larına destek sağlıyor. Resmi Fedora Linux Spins'teki dikkate değer değişiklikler arasında, Fedora Cinnamon Spin için en son Cinnamon 6.0 masaüstü ortamı, Edge ve IoT kullanım senaryolarına uygun bir işletim sistemi sağlamak amacıyla Fedora IoT spin için OSTree desteği ve yeni bir dağıtım aracı olan Basitleştirilmiş Provizyon yer alıyor. Üstelik Fedora Silverblue ve Fedora Kinoite sürümleri, önyükleyici güncellemelerini yönetmek için bootupd'yi kullanacak. Bu sürümle birlikte rpm-ostree tabanlı Fedora çeşitleri artık Silverblue, Kinoite, Sway Atomic ve Budgie Atomic'ten oluşan Fedora Atomic Desktops adlı tek bir şemsiye altında sunuluyor . Bir kez daha, yeni Fedora Linux sürümü , Fedora Linux'u kurarken yenilenmiş bir kullanıcı arayüzü ve yeni özellikler vaat eden, uzun zamandır beklenen Anaconda yükleyicisini getiremedi . Bu, bu yılın sonlarına doğru planlanan bir sonraki sürüm olan Fedora Linux 41'e ertelendi. Fedora Linux 40 artık 64 bit (amd64) ve AArch64 (arm64) platformları için resmi web sitesinden indirilebilir . Mevcut Fedora Linux 39 kullanıcıları kurulumlarını DNF system-upgrade kullanarak yükseltebildikleri için bu sürüm elbette yeni kurulumlara yöneliktir . Ayrıca Fedora Linux 40'ın önceden yüklendiği bir dizüstü bilgisayar da satın alabilirsiniz . kaynak:https://9to5linux.com Read the full article
0 notes
Text
Getting Started with PHP: A Beginner's Guide to Your First "Hello World" Program

Introduction
PHP tutorial for beginners and professionals provides in-depth knowledge of PHP scripting language. Our PHP tutorial will help you to learn PHP scripting language easily.
This PHP tutorial covers all the topics of PHP such as introduction, control statements, functions, array, string, file handling, form handling, regular expression, date and time, object-oriented programming in PHP, math, PHP MySQL, PHP with Ajax, PHP with jQuery and PHP with XML.
What is PHP
PHP is an open-source, interpreted, and object-oriented scripting language that can be executed at the server side. PHP is well suited for web development. Therefore, it is used to develop web applications (an application that executes on the server and generates the dynamic page.).
PHP was created by Rasmus Lerdorf in 1994 but appeared in the market in 1995. PHP 7.0 is the latest version of PHP, which was released on 28 November. Some important points need to be noticed about PHP are as follows:
PHP stands for Hypertext Preprocessor.
PHP is an interpreted language, i.e., there is no need for compilation.
PHP can be embedded into HTML.
PHP is an object-oriented language.
PHP is an open-source scripting language.
PHP is simple and easy to learn language.

Why use PHP
PHP is a server-side scripting language, which is used to design dynamic web applications with MySQL database.
It handles dynamic content, database as well as session tracking for the website.
You can create sessions in PHP.
It can access cookies variables and also set cookies.
Using PHP language, you can control the user's to access some pages of your website.
It helps to encrypt the data and apply validation.
PHP supports several protocols such as HTTP, POP3, SNMP, LDAP, IMAP, and many more.
PHP Features

Install PHP
To install PHP, we will suggest you to install AMP (Apache, MySQL, PHP) software stack. It is available for all operating systems. There are many AMP options available in the market that are given below:
WAMP for Windows
LAMP for Linux
MAMP for Mac
SAMP for Solaris
FAMP for FreeBSD
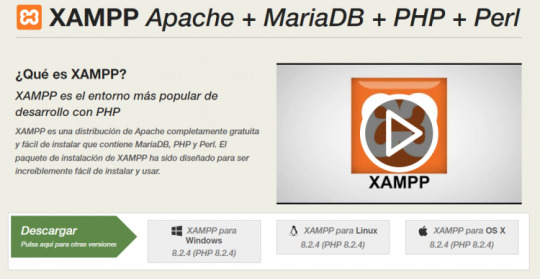
XAMPP (Cross, Apache, MySQL, PHP, Perl) for Cross Platform: It includes some other components too such as FileZilla, OpenSSL, Webalizer, Mercury Mail, etc.
How to install XAMPP server on windows
We will learn how to install the XAMPP server on windows platform step by step. Follow the below steps and install the XAMPP server on your system.
Step 1: Click on the above link provided to download the XAMPP server according to your window requirement.
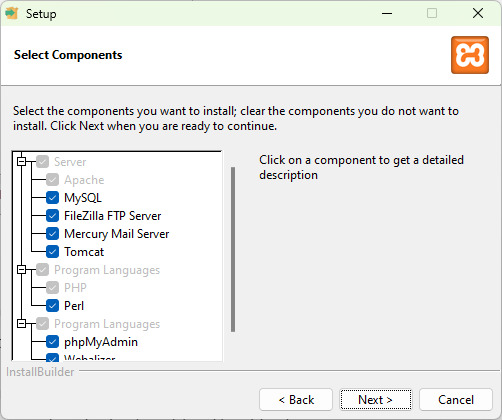
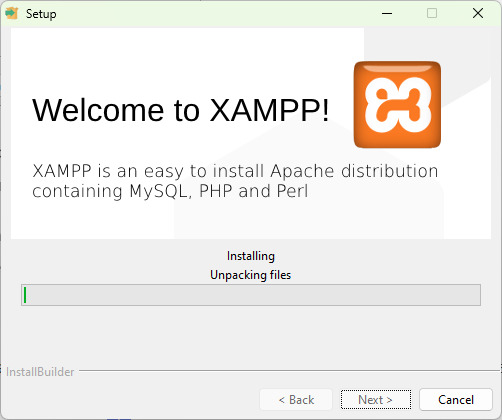
Step 2: After downloading XAMPP, double click on the downloaded file and allow XAMPP to make changes in your system. A window will pop-up, where you have to click on the Next button.
Step 3: Here, select the components, which you want to install and click Next.

Step 4: Choose a folder where you want to install the XAMPP in your system and click Next
Step 5: Click Next and move ahead
Step 6: XAMPP is ready to install, so click on the Next button and install the XAMPP.
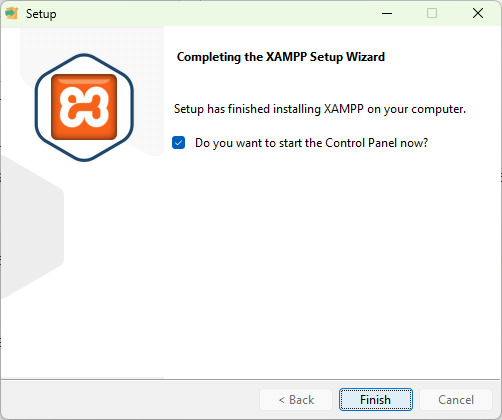
Step 7: A finish window will display after successful installation. Click on the Finish button
Step 8: Choose your preferred language
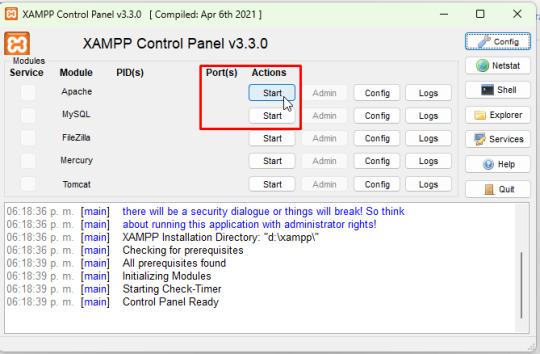
Step 9: XAMPP is ready to use. Start the Apache server and MySQL and run the php program on the localhost.
Step 10: If no error is shown, then XAMPP is running successfully

How to run PHP code in XAMPP
Generally, a PHP file contains HTML tags and some PHP scripting code. It is very easy to create a simple PHP example. To do so, create a file and write HTML tags + PHP code and save this file with .php extension.
All PHP code goes between the php tag. It starts with <?php and ends with ?>. The syntax of PHP tag is given below:
<?php
//your code here
?>
How to run PHP programs in XAMPP PHP is a popular backend programming language. PHP programs can be written on any editor, such as - Notepad, Notepad++, Dreamweaver, etc. These programs save with .php extension, i.e., filename.php inside the htdocs folder.
For example - p1.php.
As I'm using window, and my XAMPP server is installed in D drive. So, the path for the htdocs directory will be "D:\xampp\htdocs".
Step 1: Create a simple PHP program like hello world.
<?php
echo "Hello World!";
?>
Step 2: Save the file with hello.php name in the htdocs folder, which resides inside the xampp folder.
Step 3: Run the XAMPP server and start the Apache and MySQL.
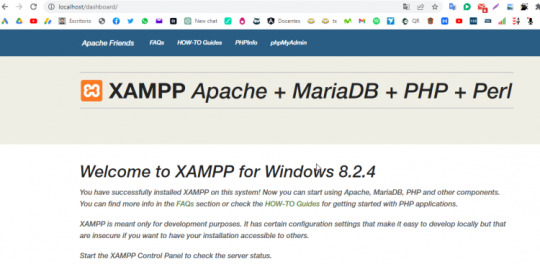
Step4: Now, open the web browser and type localhost http://localhost/hello.php on your browser window.
Step 5: The output for the above hello.php program will be shown as the screenshot below

Most of the time, PHP programs run as a web server module. However, PHP can also be run on CLI (Command Line Interface).
Credits – Shweta Patil (Backend)
MetricsViews Pvt. Ltd.
MetricsViews specializes in building a solid DevOps strategy with cloud-native including AWS, GCP, Azure, Salesforce, and many more. We excel in microservice adoption, CI/CD, Orchestration, and Provisioning of Infrastructure - with Smart DevOps tools like Terraform, and CloudFormation on the cloud.
www.metricsviews.com
0 notes
Text
How Can Hiring a Skilled PHP Development Company Enhance Your Web Security?

How to build a secure website for your business? Well, hiring an experienced PHP development company in India can help you with that. Compared to other tools, PHP frameworks can help you create web applications easier and faster. They offer a set of predefined templates, functions, and classes to structure codes, put best practices, and handle common tasks. As per 2023 stats, almost 77% of all live websites in the world use PHP. It also states that 81% of all PHP applications are for web development and 25.8% of web developers prefer PHP. But apart from that, do you know that PHP can also improve the security of your web applications? Well, let’s explore more about that in the below blog post.
5 ways PHP developers can secure your web applications
According to a 2023 report, there were almost 13.91 lakh cyber security incidents in India (2022). Another 2023 report also shows that the average weekly attacks in India have increased by 18% alone this year. And thus, it’s a must to consider security the most when creating your business site. Well, PHP developers can help you with that in the following ways,
1. Validating user input
User input is one of the sources of potential security risks. If you don’t filter and confirm the user input, you may end up with many issues. It can be malicious code execution, corrupted data, and broken functionalities.
PHP developers can keep you safe from this with the built-in/customized validation rules and error messages of PHP frameworks.
PHP features make sure that the inputs meet your requirements and expectations.
It also ensures that the inputs are free from invalid or harmful values to prevent bugs and errors.
2. Encrypting data
Data encryption is a must for businesses. It’s a process to transform the data into an unreadable form using algorithms or secret keys. It makes your data less vulnerable to theft, interception, or modification.
PHP frameworks come with built-in and external libraries like Sodium or OpenSSL.
They allow you to encrypt/decrypt your data using many methods like salting, symmetric or asymmetric encryption, etc.
3. Preventing SQL injection
SQL injection is a type of attack that can exploit a vulnerability in your database. If anyone injects a malicious SQL command into your input field or URL parameter, the data can be compromised.
PHP frameworks can prevent it by using query blinders or prepared statements.
It can also sanitize your input values to escape any harmful characters and treat them as literals.
4. Implementing HTTPS
HTTPS (Hypertext Transfer Protocol Secure) encrypts the communication between servers and users’ browsers. It can also prevent anyone from spoofing, eavesdropping, or tampering with your traffic.
PHP developers can install HTTPS by using your site’s configuration setting.
They can enforce HTTPS to your entire web application or certain routes to redirect any HTTP to HTTPS.
5. Protecting from CSRF
CSRF (Cross-Site Request Forgery) is a type of attack that tricks users perform unwanted actions on your website. This can result in data loss, unauthorized changes, and account takeover.
PHP frameworks can protect your data against CSRF, using several tokens or hashes.
They generate random and unique values for each request to verify it before processing.
PHP is one of the most chosen frameworks for building web applications. Using various features and tools, they can protect your web application from various threats. All you’ll need is to hire an expert PHP development company in India for the work.
Also Read: ChatGPT Vs Google Bard: How They Stack Up Against Each Other
0 notes
Text
Linux + Android
Min Samsung Galaxy S9 (Exynos/starlte)
Phone: Samsung Galaxy S9
ROM: LightROM
TWRP: starlte
OS: Android/GNU/Linux
hko@localhost:~$ uname -a
Linux localhost 4.9.59-16553818 #1 SMP PREEMPT Mon Jul 29 16:22:52 KST 2019 aarch64 aarch64 aarch64 GNU/Linux hko@localhost:~$
@Terminal on localhost running apache, ssh, vpn, vps, bnc, web & mail server etc.
Should be much more convenient with a computer,…
View On WordPress
#follow#1312#Android#apache2#bnc#Debian Android#Exonys#Hello#HSS#LightROM#magiskmanager#manisk#manisk.org#Odin#openssh#openssl#php#pie#root#root samsung s9#roota s9#roota samsung s9#samsung galaxy s9#Samsung Linux Ubuntu#Samsung S9 Linux Ubuntu GNU#Samsung s9 root#Samsung s9 Ubuntu#SElinux#SSH#starlte
0 notes
Text
XAMPP dan WAMP, Manakah yang Lebih Baik?

Sebelum menentukan manakah tools yang lebih baik untuk digunakan. Mari berkenalan terlebih dahulu dengan XAMPP dan WAMP. Yuk, simak ulasan berikut ini.
Pengertian XAMPP & WAMP
XAMPP adalah sebuah perangkat lunak yang sistem penamaannya berdasarkan akronim kata Apache (Web Server), MySQL Database, Bahasa Pemrograman PHP dan PERL. Sedangkan huruf X pada awal kata merupakan istilah cross platform, dimana software ini dapat digunakan di berbagai macam sistem operasi seperti Linux, Windows, MacOS, dan solaris. XAMPP merupakan aplikasi berbasis open source, yang biasa digunakan dalam pengembangan website. Program ini tersedia dalam GNU (General Public License), yang bisa didapatkan secara gratis.
WAMP adalah singkatan dari Windows (OS), Apache (Web Server), MySQL Database, Bahasa Pemrograman PHP. WAMP juga digunakan untuk menjalankan web server pada sistem operasi Windows. WAMP berfungsi sebagai virtual atau local server yang dijalankan di komputer pribadi. WAMP mempermudah pekerjaan back-end dan front-end developer. Software ini memungkinkan untuk mendesain dan mengembangkan website tanpa harus khawatir mengubah kode dalam website.
XAMPP vs WAMP
Untuk menentukan mana yang lebih baik, perhatikan terlebih dahulu kelebihan dan kekurangan dari masing-masing tools.
Kelebihan XAMPP
XAMPP jauh lebih mudah di konfigurasi dan digunakan dibandingkan dengan web server lainnya;
XAMPP merupakan software lintas platform yang tersedia untuk berbagai sistem operasi;
Hanya dengan satu perintah saja semua web server + database stack dapat dimulai dan dihentikan;
Software ini memiliki banyak modul penting seperti OpenSSL, PhpMyAdmin, MediaWiki, WordPress, dan masih banyak lagi.
Kekurangan XAMPP
Konfigurasi dan pengaturan XAMPP lebih sulit dibandingkan dengan WAMP
Kelebihan WAMP
Sangat mudah mengubah konfigurasi pada WAMP.
WAMP membuat pengkodean PHP dan pembuatan database di platform Windows menjadi jauh lebih mudah;
WAMP tersedia pada sistem 64-bit dan 32-bit.
Kekurangan WAMP
Proses instalasi WAMP tidak semudah XAMPP.
XAMPP dan WAMP tentu memiliki beberapa kesamaan dan perbedaannya sendiri. Kesamaan yang dimiliki oleh XAMPP dan WAMP adalah keduanya sama-sama bersifat open source yang dapat diunduh secara gratis. Selain itu, kedua software ini memiliki keunggulan tidak perlu mengunduh satu-per-satu Apache, PHP, dan MySQL untuk membuat web server dapat berfungsi di komputer.
Sedangkan perbedaan dari kedua software ini adalah XAMPP memiliki imbuhan “X” yang berarti program ini dapat berjalan secara lintas platform, dimana software ini mendukung berbagai sistem operasi. Sementara WAMP adalah local server yang hanya mendukung sistem Windows saja. Perbedaan selanjutnya adalah, konfigurasi pada software XAMPP jauh lebih mudah dibandingkan dengan WAMP. XAMPP mendukung PHP, PERL, MySQL, sementara WAMP hanya mendukung MySQL dan PHP.
Jadi, mana yang lebih baik? XAMPP atau WAMP?
Tak dapat dipungkiri, XAMPP dan WAMP merupakan local server yang terorganisir dengan baik dan dapat diandalkan. Keduanya memiliki banyak manfaat dan sangat berguna, khususnya bagi para web developer. Pilihan mana yang lebih baik disesuaikan dengan tingkat kenyamanan dan kebutuhan penggunanya itu sendiri. Jika pengguna hanya menggunakan bahasa pemrograman PHP dan sistem operasi Windows OS, WAMP menjadi pilihan yang tepat. Di sisi lain, jika pengguna ingin menggunakan serangkaian fitur tambahan untuk membuat website unik dan eksklusif, serta mengerjakan proyek di berbagai sistem operasi, XAMPP lah solusinya.
Baca Juga: Mengenal Apa itu Aplikasi XAMPP Secara Lengkap
1 note
·
View note
Text
Perl For Mac

Download Perl from ActiveState: ActivePerl. Download the trusted Perl distribution for Windows, Linux and Mac, pre-bundled with top Perl modules – free for development use. MacOS Editors Applications - TextEdit (set up as a Plain Text Editor); TextMate (commercial); vim (graphical version, command line version comes with recent macOS versions); Padre. If you have ever thought about getting into programming on your Mac, Perl is a great place to start! Preparing for Perl. All you will need for this primer is a text editor, the terminal, and Perl (of course!). Luckily for us, Perl comes with OS X 10.7 and previous versions of. Perl on Mac OSX. OSX comes with Perl pre-installed. In order to build and install your own modules you will need to install the 'Command Line Tools for XCode' or 'XCode' package - details on our ports page. Once you have done this you can use all of the tools mentioned above. Perl on other Unix like OSs. Start developing with Perl for free on Windows, Mac and Linux. Trusted by Developers, Proven for the Enterprise. The #1 Perl solution used by enterprises. Save time and stop worrying about support, security and license compliance. With the top Perl packages precompiled, and a range of commercial support options.
Perl Ide For Mac
Php For Macintosh
Mac Perl Install
Perl Activestate
Activeperl 5.24.1
ActivePerl: Support your mission-critical applications with commercial-grade Perl from ActiveState – The world’s most trusted Perl distribution.
Start developing with Perl for free on Windows, Mac and Linux
The #1 Perl solution used by enterprises


Save time and stop worrying about support, security and license compliance. With the top Perl packages precompiled, and a range of commercial support options, ActivePerl lets your team focus on productivity with Perl that “just works”.
HUNDREDS OF INCLUDED PERL MODULES
Essential tools for Perl development including CGI scripting, debugging, testing and other utilities
Major ActivePerl components such as OLE Browser, PerlScript, Perl for ISAPI, PerlEx and Perlez
Windows scripting with specific documentation for ActivePerl on Windows
GET YOUR APPS TO MARKET FASTER
ActivePerl includes the top Perl packages, pre-verified to ensure against outdated or vulnerable versions, incompatibility and improper licensing, so you can:
Increase developer productivity
Enable and secure mission-critical applications
Satisfy corporate requirements for support, security and open source license compliance
INTEGRATED WITH THE ACTIVESTATE PLATFORM
ActivePerl, featuring hundreds of popular packages, is available free for download from the ActiveState Platform. But you can also use the Platform to automatically build your own version of Perl from source, that can include:
Any supported version of Perl
Thousands of packages not featured in our ActivePerl distribution
Just the packages your project requires, such as those we’ve prebuilt for WebDev projects
Reduce Security Risks Ensure security with the latest secure versions of Perl packages (i.e. the latest OpenSSL patch) and timely updates for critical issues.

Indemnification and License Compliance Comply with your organization’s open source policies against GPL and GNU licensing, and reduce risk with legal indemnification.
Commercial Support & Maintenance Keep your IP out of public forums and get faster, more reliable help with guaranteed response times and Service-Level Agreements
Enforce Code Consistency Maintain consistency from desktop to production – Windows, macOS, Linux and big iron (AIX, Solaris).
Perl Ide For Mac
Avoid Lock-In with Open Source 100% compatible with open source Perl so you can recruit skilled staff, ramp up faster and avoid vendor lock-in.
Accelerate Time to Market Spend less time setting things up and more time getting things done, with the top Perl packages precompiled and ready to go.
Php For Macintosh
Lack of support for open source software can create business risks. ActiveState’s language distributions offer guaranteed support SLAs and regular maintenance updates.
As much as 95% of code bases incorporate undisclosed open source code. Protect your IP with legal indemnification.
As much as 95% of IT organizations leverage open source software (OSS). However, incorporating OSS into your project often comes with licensing terms on how you can distribute your product.
How to Build Perl without a Compiler20201029112146
How to Build Perl without a Compiler
Top 10 Python Tools for IT Administrators20201023062138
Top 10 Python Tools for IT Administrators
The Future of Perl at ActiveState (Part 2 of 2)20201001124600
The Future of Perl at ActiveState (Part 2 of 2)

Download the trusted Perl distribution for Windows, Linux and Mac, pre-bundled with top Perl modules – free for development use.
Get ActivePerl Community Edition
32-bit and other older/legacy versions are available through the ActiveState Platform with a paid subscription. See pricing here.
ActivePerl is now offered through the ActiveState Platform. Create a free account above and get these benefits:
Download Perl and get notified of updates
Customize Perl with only the packages you need
Share your Perl runtime environment with your team
Mac Perl Install
Build a custom Perl tailored to your needs
Pick only the packages you need
We automatically resolve all dependencies
You get an easy-to-deploy runtime environment
Build for Windows and Linux. MacOS coming soon.
By downloading ActivePerl Community Edition, you agree to comply with the terms of use of the ActiveState Community License. Need help? Please refer to our documentation.
Looking to Download Perl For Beyond Development Use? Take a look at our licensing options.
Perl Activestate
Commercial support, older versions of Perl, or redistributing ActivePerl in your software – We’ve got you covered on the ActiveState Platform. Compare pricing options in detail.
Activeperl 5.24.1
Build, certify and resolve your open source languages on the ActiveState Platform. Automate your build engineering cycle, dependency management and checking for threats and license compliance.
1 note
·
View note
Video
youtube
How to Install Wordpress With Nginx on Debian 10 VPS
This video shows you how to install WordPress with Nginx on Debian 10 VPS.
============================== INITIAL SERVER SETUP DEBAIN 10 ============================== Login to Server: ssh root@your_server_ip
apt update -y && apt upgrade -y
adduser debian
usermod -a -G sudo debian
Configure SSH : nano /etc/ssh/sshd_config
Add and change the information: Port 22500 Protocol 2 PermitRootLogin no
Add to End of File : UseDNS no AllowUsers debian
Save and Close
Restart SSH service: systemctl restart ssh.service
Logout:
Ctrl+D
Login using user with sudo privilages: ssh -p 22500 user@ip_address
============================== INSTALL NGINX, PHP AND MARIADB ============================== Install Nginx, MariaDB, PHP, and other PHP modules : sudo apt install nginx mariadb-server mariadb-client php-cgi php-common php-fpm php-pear php-mbstring php-zip php-net-socket php-gd php-xml-util php-gettext php-mysql php-bcmath unzip wget git curl -y
Open the php.ini file: sudo nano /etc/php/7.3/fpm/php.ini
Make the following changes: post_max_size = 64M memory_limit = 256M max_execution_time = 300 upload_max_filesize = 32M date.timezone = America/Chicago //optional
Save and Close : Ctrl O+X
Restart PHP-FPM service: sudo systemctl restart php7.3-fpm.service
============================== CONFIGURE NGINX FOR WORDPRESS ============================== Create root directory: sudo mkdir /var/www/domain
sudo nano /etc/nginx/sites-available/domain.name
------------------------------ server { listen 80; root /var/www/linuxscoop.cc; index index.php; server_name domain.name www.domain.name;
access_log /var/log/nginx/domain.name_access.log; error_log /var/log/nginx/domain.name_error.log;
client_max_body_size 64M; location = /favicon.ico { log_not_found off; access_log off; }
location = /robots.txt { allow all; log_not_found off; access_log off; }
location / { try_files $uri $uri/ /index.php?$args; }
location ~ \.php$ { try_files $uri =404; include /etc/nginx/fastcgi_params; fastcgi_read_timeout 3600s; fastcgi_buffer_size 128k; fastcgi_buffers 4 128k; fastcgi_param SCRIPT_FILENAME $document_root$fastcgi_script_name; fastcgi_pass unix:/run/php/php7.3-fpm.sock; fastcgi_index index.php; } location ~* \.(js|css|png|jpg|jpeg|gif|ico|svg)$ { expires max; log_not_found off; } } ------------------------------ sudo nginx -t sudo ln -s /etc/nginx/sites-available/domain.name.conf /etc/nginx/sites-enabled/ sudo systemctl restart nginx.service sudo systemctl restart php7.3-fpm.service
============================== CONFIGURE A WORDPRESS DATABASE ============================== sudo mysql_secure_installation
mysql -u root -p
CREATE DATABASE dbwordpress DEFAULT CHARACTER SET utf8 COLLATE utf8_unicode_ci;
GRANT ALL ON dbwordpress.* TO 'wpuser'@'localhost' IDENTIFIED BY '5tR0n6p@s5WorD';
FLUSH PRIVILEGES;
EXIT;
============================== INSTALL WORDPRESS ============================== cd /tmp wget https://wordpress.org/latest.tar.gz tar -xvzf latest.tar.gz cd wordpress cp /tmp/wordpress/wp-config-sample.php /tmp/wordpress/wp-config.php sudo cp -av wordpress/. /var/www/domain/
WordPress secret key generator : curl -s https://api.wordpress.org/secret-key/1.1/salt/ ------------------------------ define('AUTH_KEY', '|V^%QD3_3G*Q7oaQRYtC).`CRE2c(pOf rR9D8|%G-y~=AmGH.bhf.vYJ1j~-wQR'); define('SECURE_AUTH_KEY', '_Wa.<dawj6|+w0%0:K3D<0;+d,|]H7-oea,CVT_(2ha~+N(&7d+] ${-RA#^S9o<'); define('LOGGED_IN_KEY', 'hQH<I^d3G20Lp,ep%>f}m#beM9|vL&Yxt5iJwK4qlK25Qe#_+Np4Su?WZzQ~)+@R'); define('NONCE_KEY', ')b(/p}n{+BR=<| ^Hs=7G<A?Q9C?X=}fnR2x8r)U-V;|-|A4G:zV58pxicLd~G%/'); define('AUTH_SALT', 'HLJl6K5b4uGPsb^ev?E!Qi<4_0PD[z/|.CNx+cM8 O-&Qe l(tQ_j#@ellU)kd +'); define('SECURE_AUTH_SALT', 'sw1uE~TgH5~gYK23kdvn_p.<yS,G{8_G^=.m)1Y2U+34vvQWK4}D[}} %K:w^tw='); define('LOGGED_IN_SALT', 'y1Yb 2xG;yHgN*&*L|i2{mrfdGmPX2.E|l=U%gekC$x@G;dxTIL|-cw]zJZv{- <'); define('NONCE_SALT', '.coEf^|KY.|$`>MmuW5H(bEFY&_*r4Jky(Dh?,M6V)`!867aG~9-V+ESJK}rq9`8'); ------------------------------ sudo nano /var/www/linuxscoop/wp-config.php ------------------------------ // ** MySQL settings - You can get this info from your web host ** // /** The name of the database for WordPress */ define( 'DB_NAME', 'database_name' );
/** MySQL database username */ define( 'DB_USER', 'database_user' );
/** MySQL database password */ define( 'DB_PASSWORD', 'database_passsword' );
/** MySQL hostname */ define( 'DB_HOST', 'localhost' ); ------------------------------ sudo chown -Rv www-data:www-data /var/www/domain/
============================== INSTALL AND CONFIGURE LET'S ENCRYPT SSL CERTIFICATE ============================== sudo apt install python3-acme python3-certbot python3-mock python3-openssl python3-pkg-resources python3-pyparsing python3-zope.interface sudo apt install python3-certbot-nginx sudo certbot --nginx -d domain.name -d www.domain.name
Renew : sudo certbot renew --dry-run ============================== SETTING UP FIREWALL ============================== sudo apt install ufw sudo ufw enable sudo ufw app list sudo ufw allow 22500/tcp comment 'Open port ssh tcp port 22500' sudo ufw allow 80 sudo ufw allow 443 sudo ufw status
============================== COMPLETE WORDPRESS SETUP ============================== Install wordpress through Web Browser
5 notes
·
View notes
Text
Cryptographic recommendations
In this sheet presented cryptographic recommendation and libraries to use.
Recommendations:
Key exchange: Diffie–Hellman key exchange with minimum 2048 bits
Message Integrity: HMAC-SHA2
Message Hash: SHA2 256 bits
Assymetric encryption: RSA 2048 bits
Symmetric-key algorithm: AES 128 bits
Password Hashing: Argon2, PBKDF2, Scrypt, Bcrypt
Recommended libraries:
Python: MbedTLS, Libsodium, PyNaCl, Libnacl.
Ruby: Nacl, djb's.
JS: Crypto-js.
Go: Crypto.
Java: Java.security, Javax.crypto.
PHP: Hash, OpenSSL.
C/C++: OpenSSL.
Do not use:
C: random(), rand() ----> getrandom(2)
Java: java.util.Random() ----> java.security.SecureRandom
PHP: rand() or mt_rand() ----> random_int() or random_bytes()
References:
OWASP Guide to Cryptography Mozilla TLS wiki
3 notes
·
View notes
Text
Tutorial: Cómo instalar XAMPP en tu computadora para crear un entorno de desarrollo local

XAMPP es un paquete de software gratuito que incluye los componentes necesarios para crear y gestionar aplicaciones web. Está compuesto por un servidor web Apache, una base de datos MySQL, el lenguaje de programación PHP y otros módulos adicionales como OpenSSL y phpMyAdmin. XAMPP es una solución todo en uno que permite a los desarrolladores crear y probar aplicaciones web localmente en su propia computadora, sin necesidad de conectarse a un servidor remoto. Esto es especialmente útil para desarrolladores que trabajan en entornos de desarrollo local, donde pueden crear y probar sus aplicaciones antes de subirlas a un servidor de producción. XAMPP es compatible con múltiples plataformas, incluyendo Windows, Linux y macOS, lo que lo hace una opción popular para desarrolladores de diferentes sistemas operativos. Además, su instalación y configuración son relativamente sencillas, lo que lo hace una opción conveniente para quienes buscan una solución todo en uno para su entorno de desarrollo web local. A continuación, encontrarás los pasos para instalar XAMPP según la documentación oficial: Descarga XAMPP desde la página web oficial (https://www.apachefriends.org/es/index.html). Asegúrate de descargar la versión adecuada para tu sistema operativo.
Una vez que la descarga haya finalizado, ejecuta el instalador. Si estás utilizando Windows, es posible que aparezca un mensaje de advertencia de seguridad. Haz clic en "Ejecutar" para continuar.

Selecciona los componentes que deseas instalar. Por defecto, se instalarán Apache, MySQL, PHP y phpMyAdmin, pero puedes agregar o quitar componentes según tus necesidades.
Selecciona la carpeta de instalación. Por defecto, se instalará en la carpeta raíz de tu disco duro (por ejemplo, "C:xampp" en Windows), pero puedes elegir otra ubicación si lo deseas. Haz clic en "Instalar" para comenzar la instalación. Es posible que se te solicite que instales los controladores necesarios para Apache y MySQL, así que asegúrate de hacerlo si es necesario.
Una vez que la instalación haya finalizado, XAMPP se iniciará automáticamente. Puedes cerrar la ventana de configuración.
Para ejecutar los servicios principales, haz clic en:
Para acceder a XAMPP, abre tu navegador web y escribe "localhost" en la barra de direcciones. Deberías ver la página de inicio de XAMPP.
¡Listo! Ahora tienes XAMPP instalado en tu computadora y puedes comenzar a crear y probar tus aplicaciones web localmente. Si te aparece la pantalla anterior, haz seguido correctamente los pasos, espera los próximos post para aprender a usar bases de datos, php, html y css en un sistema. Read the full article
0 notes
Text
The Full List of System Requirements to Install Magento 2

If you're looking to install Magento 2, one of the most important things you need to consider is whether your system meets the requirements. Magento 2 is a robust e-commerce platform that requires a specific set of software and hardware specifications to function correctly.
You must meet Magento 2 system requirements to avoid issues such as slow performance, errors, or even failure to install. In this article, we'll review the full list system requirements to install Magento 2, including the recommended hardware, software, and other prerequisites to ensure a smooth installation and optimal online store performance.
Magento 2 system requirements
Magento 2, a modern e-commerce platform, provides various web services that enable developers to access and interact with Magento's core functionalities remotely. To utilize these web services, there are several requirements that you must meet. Here are some of the key web service requirements for Magento 2: A web server: To host your Magento 2 website, you need a web server, such as Apache or Nginx, that can run PHP and support HTTPS.
Magento 2 installation: Before using Magento 2 web services, you must have Magento 2 installed and running on your web server.
Magento 2 API: Magento 2 provides a REST API and a SOAP API that you can use to access its functionalities remotely. To use these APIs, you need to enable them in the Magento 2 backend and configure access permissions.
Authentication: Magento 2 web services require authentication to ensure that only authorized users can access them. You can use OAuth or token-based authentication to secure your web services.
XML or JSON format: Magento 2 web services use either XML or JSON format to transfer data between the client and the server. You must ensure that your client supports the design you want to use.
HTTP or HTTPS: Magento 2 web services support HTTP and protocols. However, using HTTPS to ensure secure data transmission is highly recommended.
PHP extensions: Magento 2 web services require specific PHP extensions to function correctly. These extensions include SOAP, OpenSSL, and Curl.
By meeting these web service requirements, you can leverage the power of Magento 2 and develop custom applications that can access and interact with its functionalities remotely. This can enhance the user experience of your e-commerce website and increase its overall efficiency.
Magento 2 service requirements
Magento 2 is a powerful e-commerce platform that requires specific system requirements to function correctly. These requirements can vary based on the size of your store and the number of visitors you expect to receive. Here are some of the essential Magento 2 service requirements:
Web server: Magento 2 requires a web server that supports PHP 7.4 or later, including Apache, Nginx, and Microsoft IIS.
Database: Magento 2 requires a relational database management system (RDBMS) such as MySQL, MariaDB, or Percona.
PHP extensions: Magento 2 requires specific PHP extensions to function correctly, such as PHP extensions for BCmath, Ctype, cURL, DOM, GD, hash, iconv, intl, Mbstring, OpenSSL, PDO_mysql, SimpleXML, SOAP, XSL, and Zip.
ElasticSearch: Magento 2 uses ElasticSearch to provide advanced search functionality. ElasticSearch can be installed on the same server as Magento or on a separate server.
Redis or Varnish: Magento 2 uses Redis or Varnish to improve performance and reduce server load. Redis is used for session storage and caching, while Varnish is used for full-page caching.
RAM and CPU: The amount of RAM and CPU required by Magento 2 can vary depending on the size of your store and the number of visitors you expect to receive. Magento 2 recommends a minimum of 2GB of RAM and a 2GHz or faster CPU.
SSL certificate: Magento 2 requires an SSL certificate to ensure secure data transmission between the web server and the client.
Meeting these Magento 2 service requirements ensures your e-commerce store runs smoothly and provides a great user experience. Failure to fulfill these specifications may end in slow performance, errors, or even failure to install Magento 2.
Magento 2 system feature detail
Magento 2 is a robust e-commerce platform that offers a wide range of features designed to help businesses sell their products online. Here are some of the key Magento 2 system features in detail:
Store management: Magento 2 provides a powerful store management system that allows you to manage multiple stores, websites, and store views from a single dashboard. You can easily create new stores and configure their settings, including languages, currencies, and tax rules.
Catalog management: With Magento 2, you can easily manage your product catalog. You can add and edit products, create categories, and set pricing and inventory levels. You can also set up attributes and attribute sets to manage your product data more efficiently.
Order management: Magento 2 allows you to manage your orders from a single dashboard. You can view, edit, process orders, manage invoices, and issue refunds. You can also create custom order statuses and workflows to match your business needs.
Marketing and promotions: Magento 2 provides a wide range of marketing and promotional tools to help you attract and retain customers. You can create discounts, coupons, and special offers, set up email campaigns, and manage customer loyalty programs.
Payment and shipping: Magento 2 supports various payment and shipping options, including PayPal, credit cards, and direct bank transfers. You can set up shipping rules based on weight, destination, and shipping carrier and provide customers with real-time shipping rates.
SEO and analytics: Magento 2 has built-in SEO features to help you optimize your store for search engines. You can set up meta tags, create search-friendly URLs, and generate site maps. You can also integrate with Google Analytics to track your store's performance and customer behavior.
Mobile-responsive design: Magento 2 offers a mobile-responsive design that allows your store to look and function seamlessly across all devices, including desktops, tablets, and smartphones.
Security and performance: Magento 2 provides robust security features to help protect your store and customer data. It also offers performance optimization tools to help improve page load times, including full-page caching and image compression.
Overall, Magento 2 is a comprehensive e-commerce platform that provides businesses with robust features to sell their products online. With its flexible and customizable design, Magento 2 can be tailored to meet the specific needs of your business.
Magento 2 enterprise requirement
Magento 2 Enterprise, or Magento Commerce, is a premium version of the Magento 2 e-commerce platform that offers advanced features and support for larger and more complex businesses. Here are some of the essential Magento 2 Enterprise requirements:
Dedicated server: Magento 2 Enterprise requires a dedicated server with a minimum of 2 cores and 8GB of RAM. A dedicated server ensures your website can handle high traffic volumes and provides optimal performance.
ElasticSearch: Magento 2 Enterprise requires ElasticSearch to provide advanced search functionality, including synonyms, stop words, and spelling correction.
Advanced reporting: Magento 2 Enterprise provides advanced reporting and analytics tools, including sales and marketing reports, customer segmentation, and Google Analytics integration.
Staging and preview environments: Magento 2 Enterprise allows you to set up staging and preview environments to test changes and updates before deploying them to your live site.
Content staging: Magento 2 Enterprise provides a content staging feature that allows you to create and preview multiple versions of your website content, including pages, blocks, and widgets.
Advanced customer segmentation: Magento 2 Enterprise provides advanced customer segmentation capabilities that allow you to target specific customer groups with personalized content, promotions, and discounts.
Performance optimization: Magento 2 Enterprise includes features such as full-page caching, image compression, and lazy loading to ensure fast page load times and a smooth user experience.
Support and maintenance: Magento 2 Enterprise comes with dedicated support and maintenance services, including security updates, bug fixes, and technical support.
Overall, Magento 2 Enterprise is designed for larger and more complex businesses that require advanced features and support to succeed in e-commerce. By meeting these Magento 2 Enterprise requirements, you can ensure that your online store runs smoothly and provides a great user experience for your customers.
In conclusion, installing Magento 2 requires meeting a set of system requirements to ensure optimal performance and functionality. These requirements include a web server, a database server, PHP, and various PHP extensions.
Magento 2 requires specific web service requirements such as SOAP and REST. Once these requirements are met, Magento 2 provides a powerful e-commerce platform that offers features such as store management, catalog management, order management, marketing and promotions, payment and shipping, SEO and analytics, mobile-responsive design, and security and performance optimization.
Magento 2 Enterprise offers advanced features and support for larger and more complex businesses, including a dedicated server, ElasticSearch, advanced reporting, staging and preview environments, advanced customer segmentation, and performance optimization. By meeting these Magento 2 system requirements, businesses can create a robust and reliable e-commerce store that can scale and adapt to meet their needs. We hope this blog on the full list of system requirements to install Magento 2 is useful to the readers.
1 note
·
View note
Link
0 notes
Link
0 notes